
Quick guide: Create and publish your first product
This guide takes you step by step so that in a few minutes you’ll have a link ready to share and start selling. Read each section, apply, save, and continue.
Actualizado el 06 de octubre de 2025
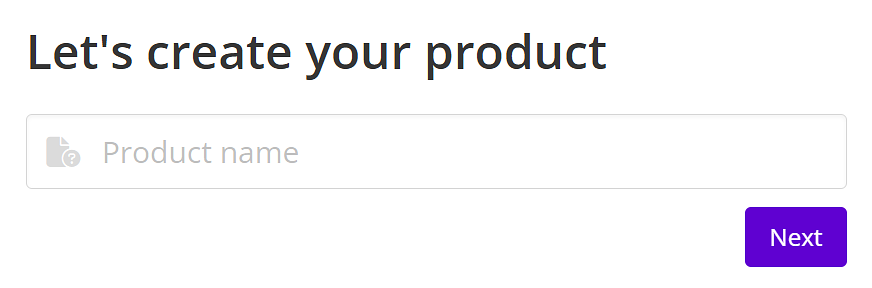
Step 1. Name of the product or service ✨
The name is the first thing your potential customers will see. It should be clear and specific.
Quick recommendations:
- Avoid generic titles such as “Complete Course.” Instead, use: “7-day intensive course in personal finance.”
- If it’s a service, clarify the format and scope: “1:1 Brand Consulting Session (60 min).”
Step 2. Basic configuration
Public URL
This is the unique link that you can share on social media, in newsletters, videos, etc. It may differ from the title (e.g., long title vs. short URL: /7dayfinance).
Category
Assign a category to keep your catalog organized and help your customers explore other products.
Description (key to selling)
The description is the heart of your product and what will determine whether your visitors become buyers. It is the first thing they read to understand the value of your offer.
The description is the section visible to all users and its purpose is to explain what you offer in a comprehensive and persuasive way. Good text makes the purchase decision easier.
To ensure that your description is effective, clearly answer the following questions:
- Who is it for? (Ideal profile)
- What does it include? (Format, modules, duration, deliverables, support, dates if applicable)
- What will the person achieve? (Transformation/final benefit)
- How does it work after purchase? (Access, delivery times, method)
If it is a downloadable product, add:
- File format (PDF, MP4, ZIP, PPT, etc.)
- Approximate size/number of pages/duration
- How to access or use it
💡 Tip: Once written, ask someone to read it and tell you what they understood. Adjust for clarity.
You can enrich it with images and/or video. Avoid very long paragraphs (max. 4–5 lines per paragraph).
Important: Do not include links to your product in this section. Links have their own specific section in Step 8.
Visibility (Show on my profile)
You can hide the product from your profile if it is a private offer, a bonus, or an exclusive pre-sale. The link will still work if you share it directly.
Don’t forget to press Save before changing sections.
Step 3. Price 💲
Enter the price in dollars (USD). The system will display the equivalent in local currency when applicable.
Rules and notes: - Minimum price: $2.50 - The buyer will see the price + gateway fees (between 0% and 9% depending on the method). - Adjust the price based on the perceived value and your margin after fees.
Save your changes after setting or updating the price.
Step 4. Available payment methods 💳
Activate the methods you want to enable (depending on your region and account settings): - Payment in dollars (international) - Payment in local currency (in enabled countries) - Cash/transfer payment (if your account allows it)
Only activate the ones you really want to offer to avoid confusing the buyer.
Step 5. Thumbnail (profile cover image) 🖼️
This is the image that will be displayed on your profile and listings.
Recommended:
- Size: 600 × 600 px (square)
- Clean design, minimal text, clear contrast
- Avoid overloading with too many elements
Step 6. Main gallery (images or videos) 🎞️
These are displayed within the individual product page.
- Use them to reinforce: screenshots, testimonials, module covers, before/after.
- If you don’t have additional visual content, you can leave a generic image of your brand.
Step 7. Checkout customization (Payment Gateway Customization) 🛒
Available options:
- Secure payment label: Adds trust (e.g., “100% secure payment”).
- Timer: Useful for limited offers. Configure message and duration.
- Custom image: Insert a reinforcing image (guarantee seal, visual bonus, etc.).
Example:
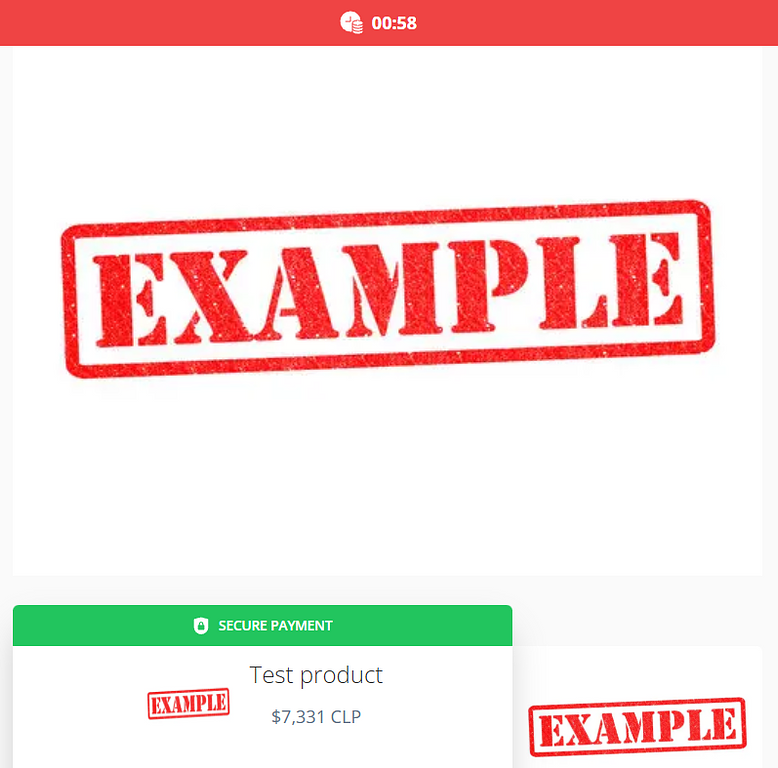
Use these elements sparingly; the goal is clarity, not distraction.
Step 8. Files and/or links 📎
Here you upload the deliverable content:
- Use “Add file” for PDFs, videos (MP4), presentations, ZIP files, etc.
- Use “Add link” for links to Zoom, Meet, booking calendars, communities, etc.
Can you use both? Yes. Example: A live workshop (Zoom link) + a PDF of materials.
Organize file names so that the client understands what each one is (e.g., “Main_Guide.pdf,” “Excel_Template.xlsx”).
Step 9. Additional information at checkout 📝
Only request additional buyer information if necessary (e.g., ID number, phone number, preferred delivery time). Requesting too much information can reduce conversions.
Step 10. Upsell and Order Bump 🔁
- Order Bump: Additional offer displayed during checkout (usually low-priced and closely related to the main product).
- Upsell: Complementary offer after payment (e.g., advanced version, premium support, exclusive community).
Configuration example:
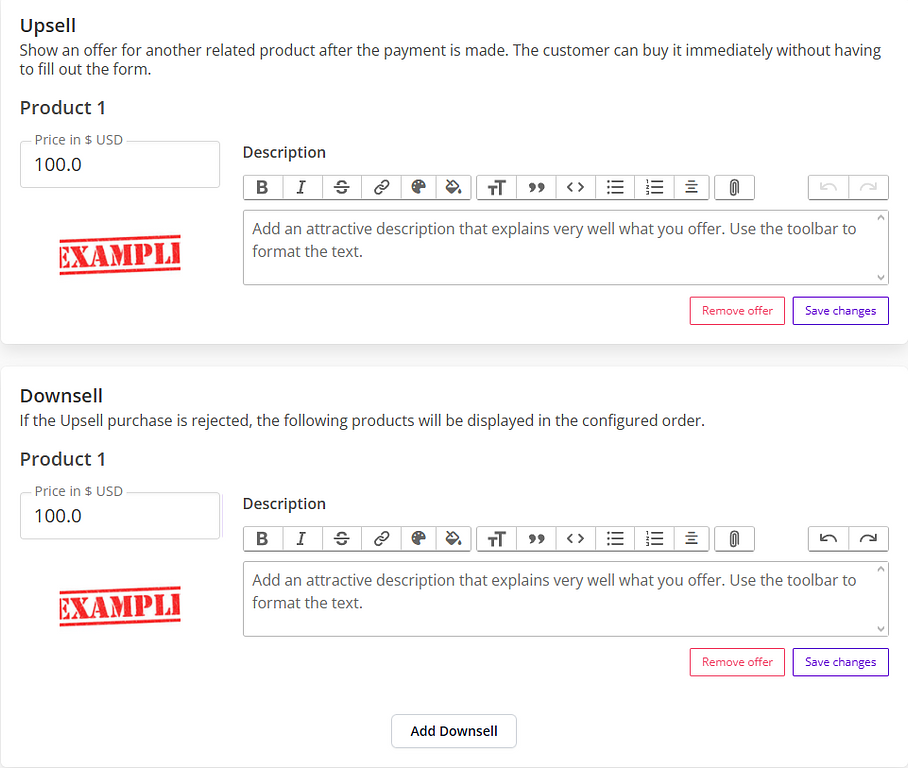
Define:
- Relevance (does it add real value for the main buyer?)
- Clarity of immediate benefit
- Proportional price (not more expensive than the main product in most cases for bumps)
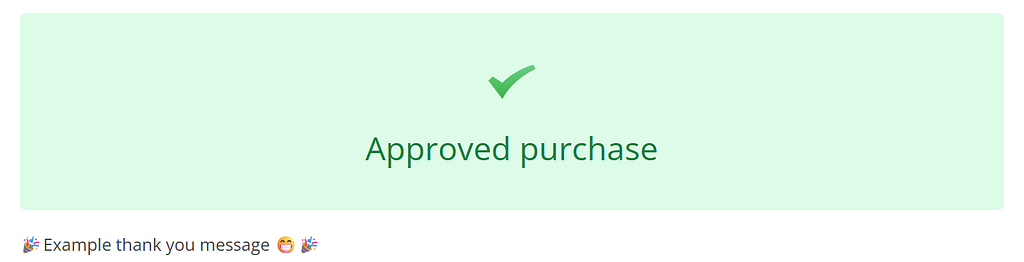
Step 11. Personalized thank you message 🙏
Customize what the customer will see after a successful payment.
Ideally include:
- Confirmation that the payment was successful
- Next steps (access, timing, support)
- Contact channel (email or support)
- Call to action (join community, check email, download material)
Visual example:
Step 12. Extra product options ⚙️
You can activate:
- Show on my profile: Publicly visible.
- Highlight on my profile: Highlighted above others.
- Notify me of each sale by email.
- Limit number of sales: Set a maximum stock (ideal for limited quantities or special editions).
- Disable the “Initiate Checkout” event in Facebook Pixel (only if you have a specific strategy that requires it).
- Send abandoned cart email: Automatic reminder to those who did not complete payment.
- Custom thank you page: Redirects to a URL you own (verify that it exists and loads quickly).
Only activate what contributes to your strategy.
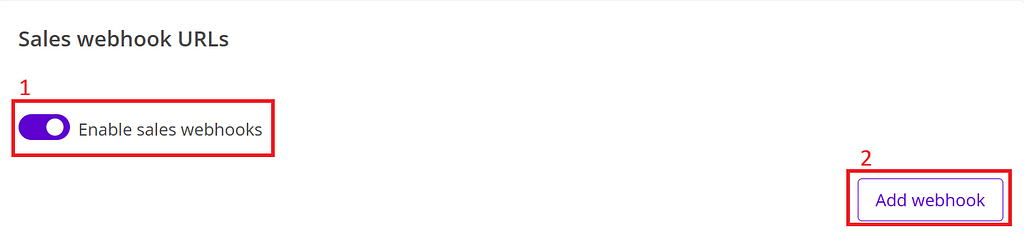
Step 13. Sales Webhooks (Sales Webhook URLs) 🔌
Webhooks allow you to receive automatic notifications in your system every time a relevant event occurs in a sale (payments, refunds, abandonments, etc.). They are useful for activating automatic access, synchronizing with your CRM, or triggering automations.
Quick setup
- Enable the Webhooks option in your product settings.
- Click Add webhook to create a new endpoint.
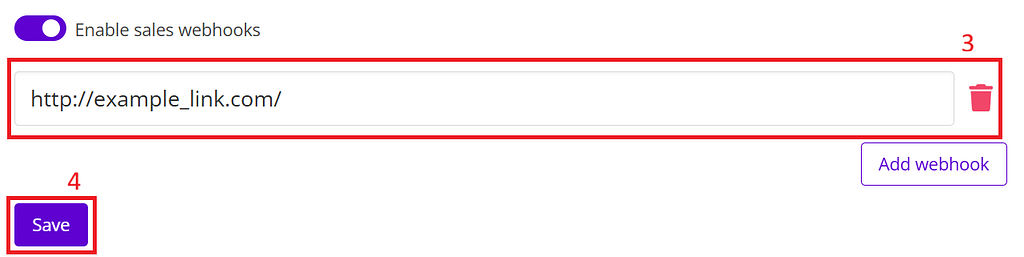
- Enter the URL of your server where you want to receive notifications (POST method).
- Save your changes.
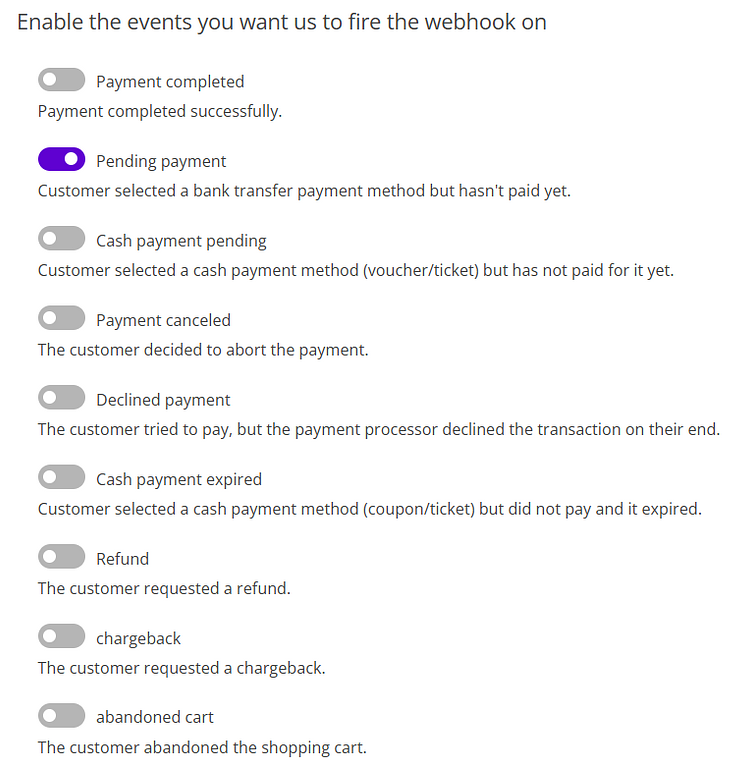
Available events
When creating the webhook, you can choose the events you want to receive. Among the most common are:
- Payment completed
- Payment pending
- Cash payment (pending)
- Payment canceled
- Payment declined
- Cash payment expired
- Payment refunded
- Chargeback
- Abandoned cart
Test the webhook
Once configured, use the Test button to send a simulation to the endpoint and verify that your system receives and processes it correctly.

The sample payload you will receive is shown below (JSON structure):
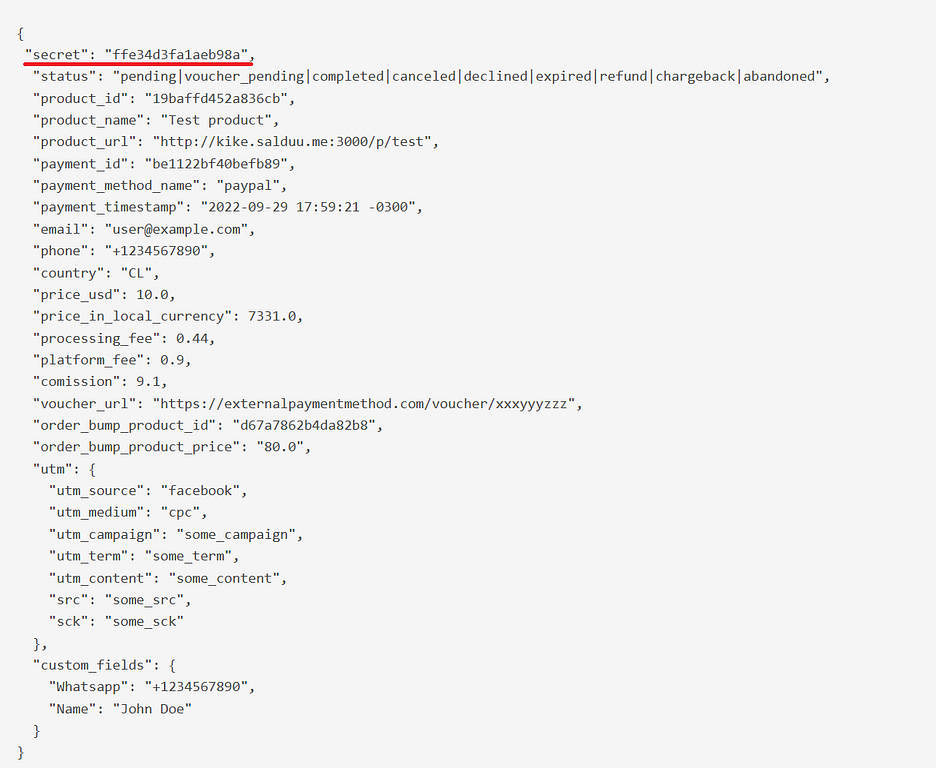
Security and verification
- Copy the secret value that appears in the configuration and validate on your server that the header or field that arrives in the request matches that secret before processing data.
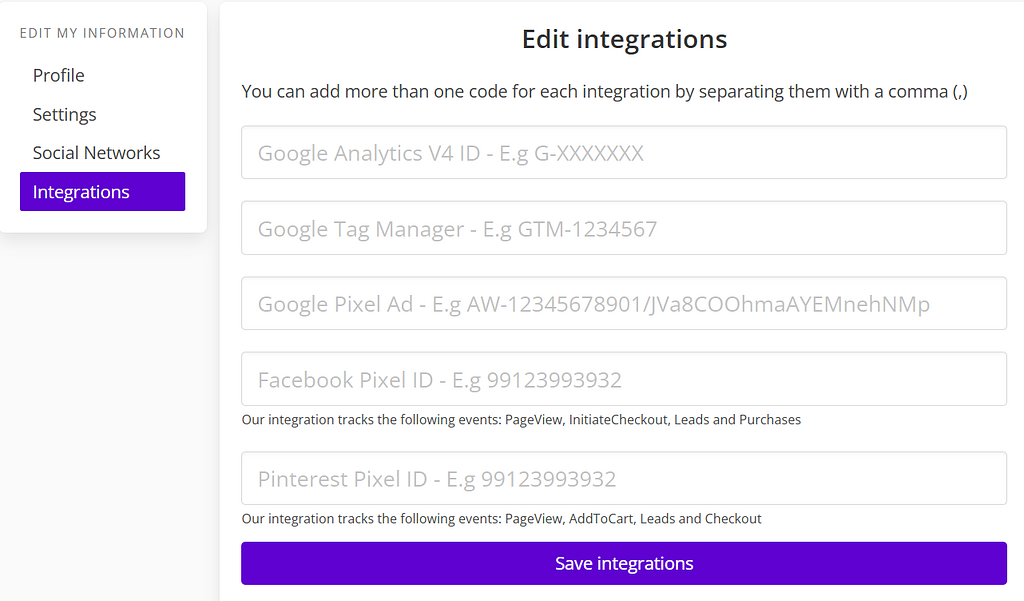
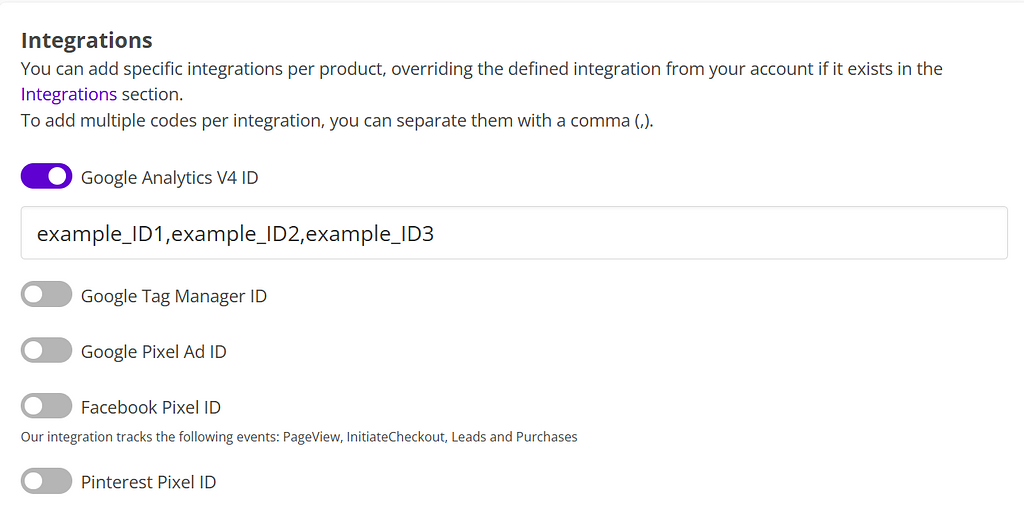
Step 14. Specific integrations 🔗
Salduu offers integrations to measure the performance of your campaigns and send events to external tools. Some supported platforms:
- Google Analytics
- Google Tag Manager
- Google Ads (Pixel)
- Facebook Pixel
- Pinterest Tag
You can define global integrations at the account level (they apply by default to all your products) or override them by product when you need specific IDs or campaigns.
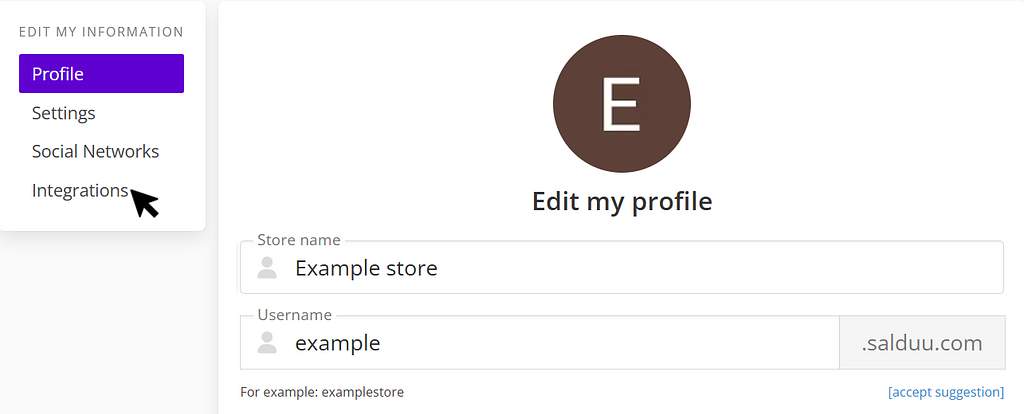
Configure global integrations
- Go to the Settings tab in your account.
- Open the Integrations section.
- Add the IDs or keys for the platforms you use (e.g., Google Analytics Measurement ID, Facebook Pixel ID, etc.) and save your changes.
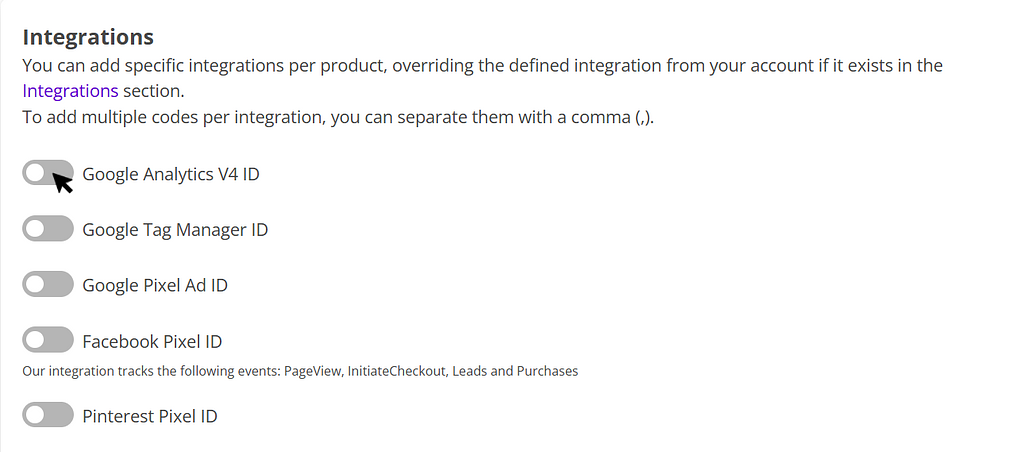
Overwrite integrations by product
If you need a product to use a different configuration (e.g., a specific campaign), you can do so from the product edit page:
- Open the Integrations tab on the product edit page.
- Select the platform and paste the specific ID or key for that product.
- You can add multiple IDs separated by commas if you want to connect the product to several campaigns.
- Save the changes.
The following example shows how to set up three custom Google Analytics campaigns for a product:
Best practices for improving conversions
- Use action verbs in the title and description.
- Include a clear and credible promise (without exaggeration).
- Ensure consistency between what you promise and what you actually deliver.
- Add testimonials or social validation when you have them (you can edit them later).
- Review initial metrics (visits vs. purchases) to optimize.
Need to optimize it later? You can re-edit any section without losing the main link.
Done! Your first product is created. Now share it and start selling. 💼
Suscribirme gratuitamente a Salduu
Serás de los primeros en saber cuando Salduu suba un nuevo producto, o publique algo en su blog!